Fine Art Photography by Per Berntsen
For more articles, click Technical articles on the menu.
Lightroom (Classic) basics
This article deals with the Classic (and earlier corresponding versions) of Lightroom. The article reflects my own workflows. Other people may recommend different workflows.
Lightroom is an image editor and organizer. Its official name is Adobe Photoshop Lightroom, which is somewhat misleading, since it has little in common with Photoshop. While Photoshop, with the exception of the Camera Raw plugin, is essentially a pixel editor that will destructively change the pixels in your files, editing in Lightroom is completetly non- destructive.
All the edits you do in Lightroom are saved to the catalog, which is an SQLite database. It is possible to additionally save the edits to the files (to xmp sidecar files in the case of proprietary raw files), but the edits will not be seen by other applications. Edits saved to files are just metadata that do not change the original files.
To get your images into Lightroom, you have to import them. Lightroom does not open files, and it is not a file browser that you can point to a folder and see the contents. The files you import can be anywhere on your computer, but Lightroom creates a reference to their location in the catalog, and also creates previews of them. All the work you do inside Lightroom is done with these previews, the images you see on screen are not the original files.
So to sum up - Lightroom never changes your originals, and your originals are not in Lightroom, they are in a folder of your choice on your computer.
Ingesting
Before importing, I recommend copying the files from the camera card to the computer. The fastest and safest way is using a card reader, preferably one that's built into the computer. The slowest and unsafest way is to connect the camera to the computer. This method uses two additional pieces of hardware (camera and usb cable), and increases the risk of image corruption caused by failing hardware. I always use the computer's operating system (Windows Explorer/Mac Finder) to copy the files.
Now is the time to decide where you want to store your images. If your computer only has one harddisk, the Pictures or My pictures folder may be as good a choice as any, but make sure to back the images up to an external harddisk. (Lightroom will not do this for you, it only bakcs up the catalog.) If you have two or more harddisks, the best choice would be, for several reasons, not to use the system disk, but one of the others. A backup solution will of course be necessary here too.
Whatever setup you choose, it's a good idea to have a parent folder that holds all the other folders. If you decide at a later stage to move that folder, it's easy to direct LR to the new location.
The images you copied to your computer will still be on the camera card. I have made it a habit never to format the card until I need to. That way I have an extra backup for a while, sometimes for as long as several months.
Importing
Open Lightroom, and click Import. Click the arrow in the bottom left corner of the dialog to expand it to full screen and to show all the options. Since the images are already where you want them, select the folder you want to import from under Source on the left, then select Add at the top of the window.
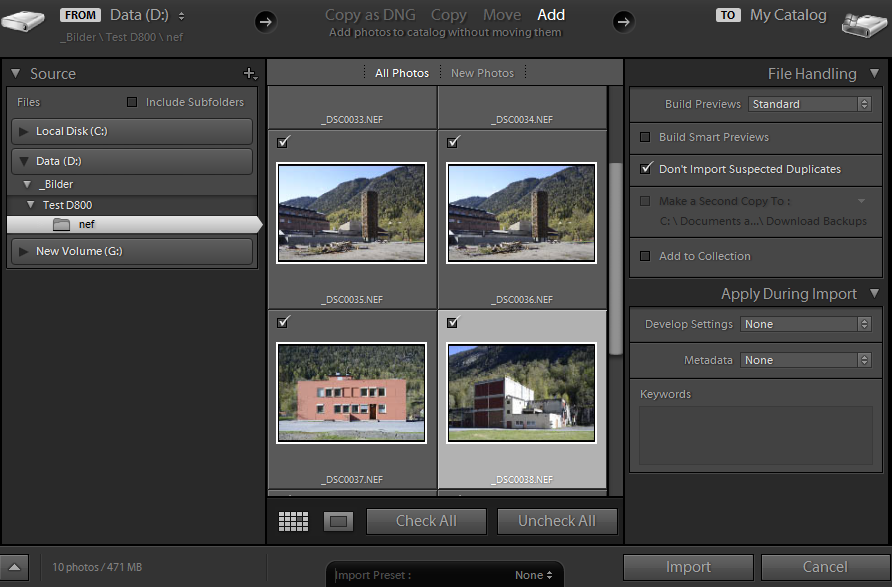
If you want to convert raw files to DNG, click Copy as DNG at the top of the window, and choose destination in the panel on the right. If you prefer to import this way, you could copy the raw files to a temporary folder before you import, and then copy as DNG to the final folder.
Copy as DNG also gives you the option to rename the files. Both methods give you options for size of previews and import presets.
Working with the catalog
Once the import is finished, the Lighroom Library will open with thumbnails of the images you just imported. In the Catalog panel on the left Previous Import will be highlighted. Another option here is All Photographs, which will display every image in the catalog.
The folders panel will list all the folders you have imported from. This does not mean that the folders are "in" Lightroom, it just means that they are referenced by the catalog. The folders (and their contents) are not touched by Lightroom, and it is in your interest to know exactly where they are on your computer. (you can right click any folder and choose Show in Explorer/Finder)
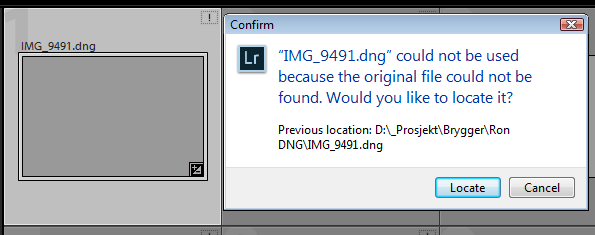
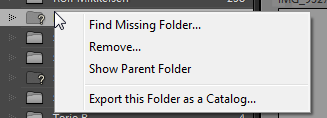
If you want to rename a file or a folder that has been imported, do it in Lightroom. If you do it outside, Lightroom will tell you that the file or folder is missing, and you'll have to point LR to to the correct location, by clicking the exclamation mark on the thumbnail, or right clicking a folder that has a question mark.
Deleting imported files and folders should also be done within Lightroom.
To delete a file, right click the thumbnail, and choose Remove. You are then given the option to either remove the file from the catalog, or delete it from disk (which will also remove it from the catalog).
You can't delete folders from disk in LR, but by right clicking a folder and choosing Remove, you can remove the folder (and the files it contains) from the catalog.
Files can be moved to a different folder by dragging and dropping, but if you want to move folders, this is done more safely with Explorer/Finder. There have been reports of a rare bug that deletes folders when moving them in Lightroom. Since the folders have been moved outside LR, they will now have question marks on them - right click the folders and point LR to the new location.
When you run Lightroom the first time, it creates a folder called Lightroom inside the Pictures or My Pictures folder. The Lightroom folder contains the catalog file, and a folder containing the previews. You can move the folder with the catalog and previews to anywhere you like on your computer. Again, if possible, move it to another drive. The ideal location is a fast SSD drive with plenty of space - the catalog itself isn't so big, but the previews folder will quickly grow to several GB. (I have 17,000 photos in the catalog, and the previews folder is 5.7 GB) You can also rename the catalog if you like, but make sure not to change the extension - .lrcat. To open the catalog from its new location, double-click it, or use File > Open in LR. (catalogs are the only files that LR can open)
Lightroom will make backups of your catalog at the interval you specify in the Catalog Settings. Press Ctrl/Cmd+Comma to access them. I have it set to Every time Lightroom exits, and choose Skip this time if i haven't done any important work. Lightroom 6/CC 2015 zips the backups, reducing them to almost 10% of the original size. Note that this will not back up your photos, only the catalog file. Backups should be made to a different drive than where the catalog resides. If you only have one drive, I suggest keeping the bakckups in a Dropbox folder.
Lightroom will let you make as many catalogs as you like, but most people only need one. Multiple catalogs will make managing your photos more complicated, and you can only work with one catalog at a time. Use keywords, metadata, ratings, colors and collections to organize and find your photos.
Exporting
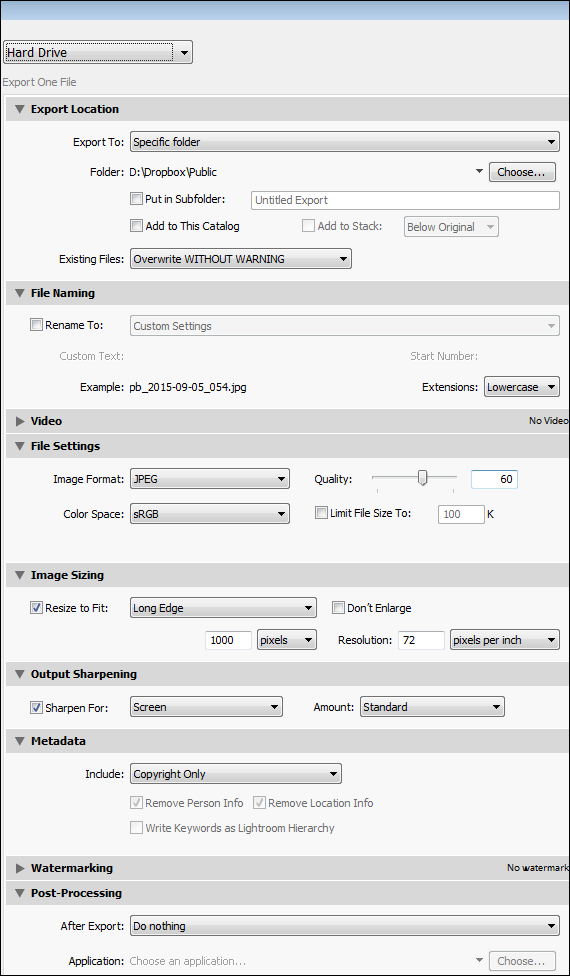
All the work you do in Lightroom is automatically saved to the catalog without any action on your part. There is no Save option, because the original files are never changed. To get your photos out of Lightroom to use them elsewhere, you have to export them. When you export a file, all the edits you have done are applied to a new file. You can export multiple files at once - select them in Library, and click Export.
I won't go into all the details of the Export dialog here, but since most people export jpgs, here are a few tips:
- Unless you know what you're doing, always use the sRGB color space.
- Use 100 quality for printing, for web use try 60 or 70 quality.
- Unless you want to export full size, check Resize to fit.
- Use pixels for web images, inches or cm for prints.
- Resolution is irrelevant for web images - they will display the same no matter what number you enter.
Below is a screenshot of a typical export for web.
Note the Overwrite without warning - if you're not pleased with an export, export it again, and overwrite the original.
When sharpening (capture sharpening) has been done properly in the Develop module, images should look right with medium or low output sharpening.
I use Lightroom only for my master files, and never import exported images back into Lightroom, there is no need to edit them, and it can create confusion and clutter. When an exported file has served its purpose, I normally delete it. Should the need arise, it's easy to export it again.
To review exported images I use ACDSee Pro. It is color managed (most image viewers aren't), customizable, and lets you assign single-key shortcuts like in Lightroom. It is not free, but well worth the money. The cheaper standard version is not color managed. Edit: The latest standard version of ACDSee (20) is color managed. If you have a CC subscription, you can use Bridge, and there is the free IrfanView, which is also color managed.
Some common problems
Preview Cache. If Lightroom gives you an errror message saying Lightroom encountered an error when reading from its preview cache and needs to quit, it means that the preview cache is corrupt. Go to the folder containing the catalog, and delete the Preview cache folder. (ending with .lrdata) Lightroom will recreate the previews on the next launch. If this happens frequently, something might be wrong with your harddisk.
Catalog is open in another application. When Lightroom is opened, a lock file is created to prevent others from accessing the catalog. (LR is single user only) Normally, this file will be deleted when you close Lighroom, but if it doesn't close down properly because of a freeze or a power failure, it might not be deleted. You will then get an error message saying that the catalog is open in another application, and you can't launch LR. This is solved by going to the Lightroom folder and deleting the lock file - it's the one that ends with .lock.
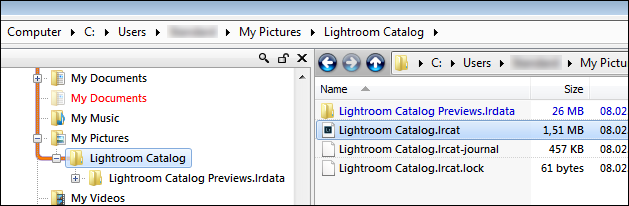
The previews folder, the catalog, the journal file and the lock file. The last two are only present when Lightroom is running.
Color issues. Lightroom is color managed, and uses the monitor profile to display colors correctly. If the profile is bad or becomes corrupted, several things can happen.
The image might not display at all in Develop, Library and Develop might display different colors, you may get a histogram with a yellowish brown cast, and Lightroom might display diffrerent colors than Photoshop.
The solution is to calibrate the monitor with a hardware calibrator, which will create a new, accurate profile. As troubleshooting and as a temporary fix, you can set the monitor profile to sRGB. See How do I change my monitor profile to check whether it’s corrupted?
GPU problems. The develop module in Lightroom 6/CC 2015/Classic uses the graphics processor for certain tasks. If Lightroom has a problem with it, it can lead to problems, like the program freezing, refusing to start, displaying a blue box instead of the image in Develop, or displaying a solarized image in Develop.
Not all these symptoms are always caused by the GPU, but if they are, the solution is to disable the GPU in LR preferences. Go to Edit (Lightroom on a Mac) > Preferences > Performance, and uncheck Use Graphics Processor.
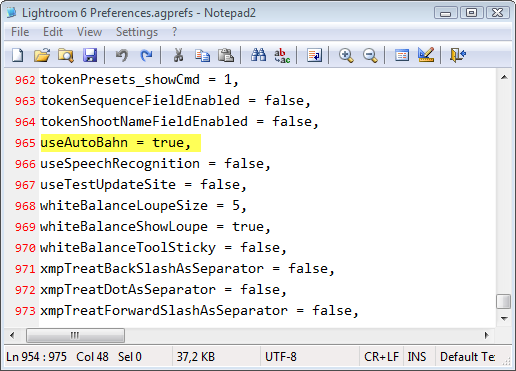
GPU problems can also make it impossible to access Preferences, in which case the GPU can only be disabled by editing the preferences file. It is done this way on Windows:
Close Lightroom. With Windows Explorer, navigate to
C:\Users\[your username]\AppData\Roaming\Adobe\Lightroom\Preferences.
Open the file Lightroom 6 Preferences.agprefs in a text editor, like Notepad. Close to the end of the file there is a line that says useAutoBahn = true, - change this to useAutoBahn = false,
Save and close the file. Now launch Lightroom.
On a Mac use the Finder, and go to Macintosh HD/Users/[your username]/Library/Application Support/Adobe/Lightroom Preferences
Open the file
Lightroom 6 Preferences.plist, then follow the procedure above.
GPU problems can sometimes be solved by updating the graphics driver to the latest version. Most users won't experience better performance by having the GPU enabled, but users with 4K or higher monitors probably will.
Deleting preferences. A corrupted preference file can lead to some of the problems listed under GPU problems, like crashes, freezes or LR refusing to launch. Other problems include a (probably) long list, like sliders not working, tools not functioning, etc. Deleting the preferences file is quite safe, Lightroom will create a new one on the next launch. The preferences are not extensive, and shouldn't take very long to customize to what you had before.
For LR 6/CC, you can reset the preferences by pressing Alt+Shift/Option+Shift immediately after clicking the shortcut to launch LR, then click Yes in the confirmation dialog.
For earlier versions, the file location is the same as for 6/CC on Windows. On a Mac, it should be in
Macinotsh HD/Users/[user name]/Library/Preferences/com.adobe.LightroomX.plist
where X is your version number.Since I don't use, or have access to a Mac, I cannot guarantee that the paths given for Mac are correct.