Fine Art Photography by Per Berntsen
For more articles, click Technical articles on the menu.
What is a digital image?
A digital image is made up of pixels.
It does not contain
any references to physical dimensions - like inches or centimeters.
But it can contain metadata called ppi - pixels per inch - which can be used by printer drivers to calculate the printed size. For on-screen viewing, ppi is irrelevant. If you post an image on the web, it will display exactly the same regardless of what the ppi is set to. Even if you're viewing it in Photoshop, Lightroom or any other image viewer, the ppi is still irrelevant - it only comes into play when printing.
Ppi is often referred to as "resolution", but that's only valid in the context of printing. The only numbers that correctly describe the resolution of an image are pixel dimensions. File size is not an indicator of resolution - a 6000 x 4000 image could be 30 MB as a raw file, 137 MB as a 16-bit tiff, and 14 MB or smaller as a jpg.
Don't confuse megabytes (file size) with megapixels (the total number of pixels in an image). A 24 megapixel camera takes pictures containing 24 million pixels - 6000 x 4000.
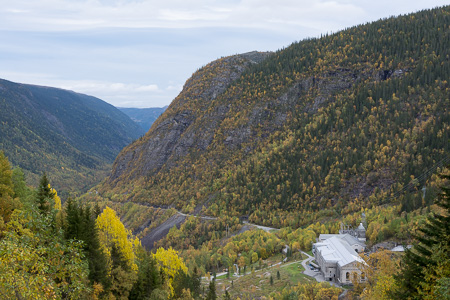
The image above measures 300 x 450 pixels.* To print this image, the printer driver will divide the pixel dimensions by the ppi value to calculate the printed dimensions. Let's say the ppi is set to 300.
300:300 = 1 - and 450:300 = 1.5 - so the print will be 1 x 1.5 inches, or roughly 2.5 x 3.75 cm.
If the ppi is set to a lower value, it will print bigger, and if set to a higher value, it will print smaller.
You can assign physical dimensions to an image in Photoshop (or in the Export dialog in Lightroom), but you are really only changing the pixel dimensions - which along with the ppi is used to calculate the physical size. There are still no physical dimensions associated with the image - only pixel dimensions and ppi - which is all that's required. But Photoshop does the math for you and displays the physical dimensions.
When setting physical dimensions, you would normally check Resample in the Image size dialog in Photoshop, or check Resize to fit in Lightroom's Export dialog - unless you want to print the image full size.
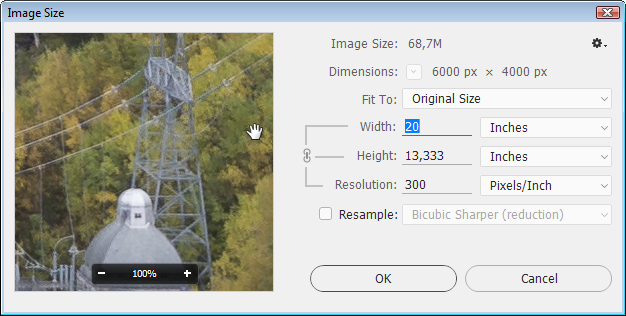
Image Size in Photoshop. 6000 x 4000 image set to print full size. Note the 100% preview of the image, which will also preview the resampling options. Bicubic Smoother is recommended for enlargement, Bicubic Sharper for reduction. I find the latter too sharp, and use Bicubic (smooth gradients) for reduction. The Image Size dialog can be resized to full screen if you like.

With Resample unchecked, halving dimensions will double the ppi. Pixel dimensions do not change.
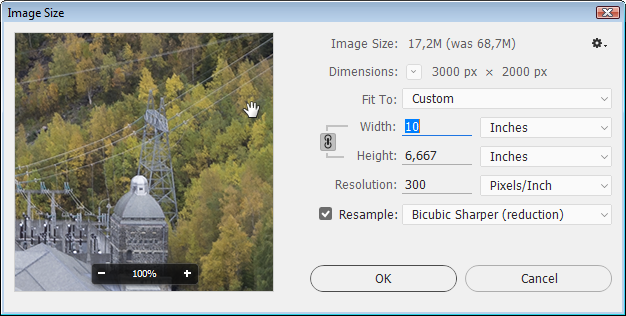
With Resample checked, the ppi stays at 300, pixel dimensions are halved and the file size is reduced to a quarter. The active lock icon indicates that image proportions are kept. Clicking the icon will unlock the proportions, and you can enter disproportionate values in the Width and Height fields - which will distort the image. So if you for instance want to print the image at exactly 8 x 10 inches, you have to crop it to 8 x 10 proportions first.
It's useful to know how big you can print an image without enlarging it. Some enlargement (upscaling) will be OK, but the more you enlarge, the more quality will suffer.
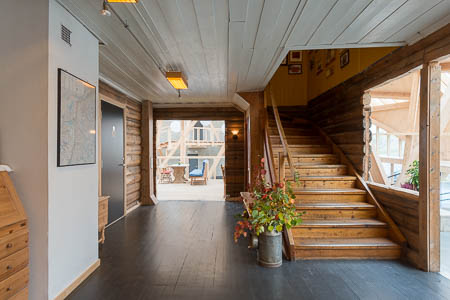
The image above was taken with a 24 megapixel camera. (1 megapixel = 1 million pixels) At 300 ppi a full size image will print at 20 x 13.3 inches. If you want to make a bigger print (at 300 ppi), there aren't enough pixels, and the missing pixels will have to be invented by interpolation. This will inevitably degrade the image, which may or may not be acceptable. An alternative would be to print at a lower ppi like 240 or 200, which would allow for making a bigger print without enlarging the image. (do the math to find out how big) But printing with a lower ppi may also affect quality - to find out what's best make two versions of the image, and print both of them. Comparing the two versions at 100% view can also be a help, but it's somewhat tricky because they won't be the same pixel dimensions.
Generally, when evaluating an image (sharpness, noise, general quality), 100% is the only reliable view. Any other view will be inaccurate and misleading, due to the scaling of the image. If you make a large image fit in window, the apparent quality may change, depending on which application you're using and the percentage the image has been scaled to. So get into the habit of always using 100% - where one image pixel is represented by one display pixel.
*It may display at a different size on your monitor due to scaling, depending on the size of your browser window, but the native size is 300 x 450. If you're using a Retina/HiDpi display, web browsers will scale images to 200%, and they will appear blurry. This site serves images (excluding screenshots) at twice the size (@2x) to Retina/HiDpi displays, so that they appear sharp.
Image modes, channels and bit depth
Images from a digital camera will be in the RGB image mode - which is made up of three channels - red, green and blue. Other common modes include CMYK (four channels, used for offset printing) and Greyscale (one channel).
All these modes can have different bit depths - like 8 bits per channel and 16 bits per channel. 8-bit images have 256 shades, or levels of color per channel, for RGB that means that the image can contain 256 x 256 x 256 = 16.7 million colors. 8-bit RGB is sometimes referred to as 24-bit, 16-bit RGB is sometimes referred to as 48-bit.
16-bit files are always twice the file size of an 8-bit file with the same dimensions. 16-bit uses 65,536 levels of each color per channel which adds up to a total of 281 trillion colors for RGB. The human eye can only distinguish around 10 million colors, so you may wonder what the point is with 16-bit. The answer is that it gives you editing headroom. If you do heavy editing on an 8-bit image, you'll lose a lot of the original levels in the image, which will lead to banding - tranistions between shades are no longer smooth - and the histogram will look like a comb because of the missing levels. Heavy editing on a 16-bit file, on the other hand, will not have any detrimental effect.
For a detailed
discussion of bit depth, see The Benefits Of Working With 16-Bit Images In Photoshop
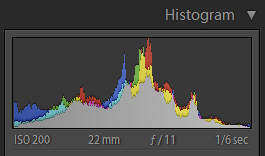
The histogram
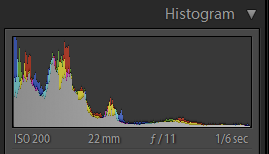
A histogram is a graphical representation of how tones are distributed in an image. The horizontal axis represents the tonal variations from dark (left) to light (right), while the vertical axis represents the number of pixels in that particular tone. Histograms in Photoshop and Lightroom also show how the individual channels are distributed.
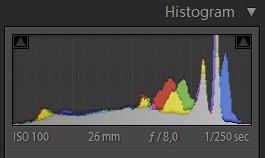
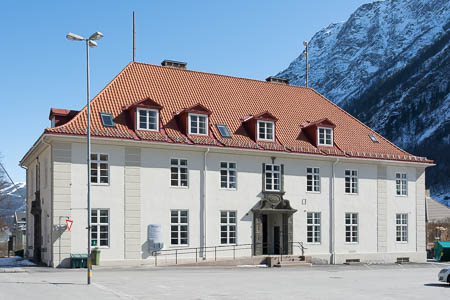
The image above is correctly exposed, and there is no lost shadow or highlight detail. In fact, there are no true blacks or whites in the image, but very close to true blacks and whites.
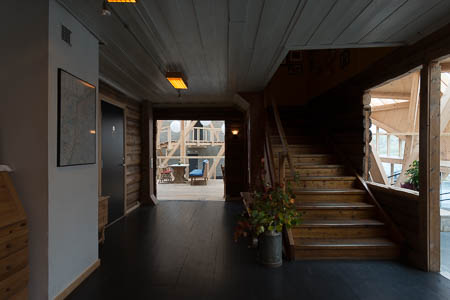
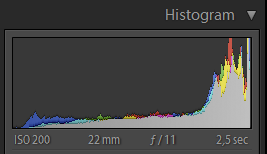
This image is underexposed, and the histogram is bumped up on the left, indicating that the shadows are clipped, and shadow detail has been lost.

This image is overexposed, and the histogram is bumped up on the right, indicating that the highlights are clipped, and highlight detail has been lost. You can normally retrieve some highlight detail from a raw file, but these highlights are blown beyond recovery.
This is the two previous images combined by using HDR (High Dynamic Range) in Lightroom. The scene's dynamic range is so high that it would be impossible to capture in one shot.